Category: Tehnika
HSDPA modem iCON 225 za 148 kn
Cheaper, bulkier, uglier…
Being the huge fan of assorted gadgetry which I just don’t need, an offer from the Croatian T-mobile subsidiary caught my eye recently – a sale on USB HSDPA datacards. As a response to VIPNet’s promotion I mentioned here, T-mobile started selling Option’s iCON 225 at half price, together with a bundled SIM-card with 148 HRK in the account. Granted, the 148 HRK will give you exactly 148 megabytes of internet traffic, whereas CARNet-sponsored tariffs would give you more than 3 gigs of traffic for the same amount of money. Still, if you don’t really use mobile broadband that much, it’s a good deal. The good thing is that this is another datacard which you can unlock for 15 € via DC-Unlocker, so you can use it with any data plan from any provider.
![]()
As for the modem itself, this bulky, fairly ugly lump of plastic comes bundled with a T-mobile simcard, a short USB extension cable, a fairly useful clip you can use to attach the modem to your laptop and a branded neck strap. 
The datacard automatically installs its drivers, and uses a branded version of Option’s GlobeTrotter Connect software. The software is lightweight, fast and tolerates other GSM providers (as opposed to the horrendous Vodafone Mobile Connect). You can replace T-Mobile Connect with the unbranded version without losing any of its functionality (you can get the generic version of GlobeTrotter Connect 3.0, without any drivers, here).
![]()
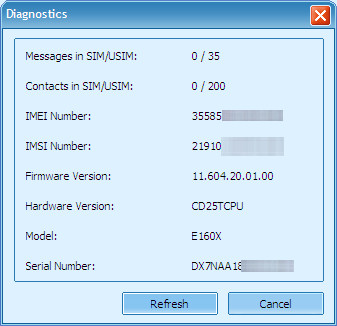
And finally, some diagnostic data…
Found modem : GlobeTrotter HSDPA
Modem Manufacturer: Option N.V.
Model : iCON 225
IMEI : 3545050xxxxxxx
Firmware : 2.5.21Hd (Date: Jun 17 2008, Time: 11:14:20)
Serial NR. : DR298AWxxx SIM
Lock status : Locked (PH-NET PIN)
Jeftinije, krupnije, ružnije…
Kao velikog ljubitelja sitnih komadića elektronike koji mi možda i ne trebaju, za oko mi je nedavno zapela akcija T-mobilea u kojoj su ponudili USB modem za bežični pristup Internetu (ili kako se to na reklamopisačkom hrvackom kaže ‘stik za mobajl internet’). Kao odgovor na VIP-ovu promociju o kojoj sam pisao, timobajlovci su ponudili Optionov iCON 225 za u pola cijene, s kojim još dolazi i sitnoslovnih 148 kn na račun. Istina, za 148 kn u ovome paketu dobit ćete upravo toliko megabajta prometa, dok bi vam to u CARNet solucijama kod Vipneta ili Tele2 donijelo do 3 GB prometa, ali ako ste nezahtjevan korisnik i ovo bi vam moglo biti dovoljno. Isplati se možda čak i otključati ovaj modem s timobajla i koristiti ga u nekom CARNet paketu, jer kao i prošli koji sam recenzirao, i ovaj se može uz malo truda unlockati za 15 € DC-Unlockerom.
Što se tiče detalja, ova gromada od modema (ili rugoba, kako vam drago) dolazi sa timobajlovom SIM karticom, par centimetara USB produžnog kabela, relativno korisnom kvačicom s kojom ga možete pričvrstiti na zaslon laptopa i timobajlovom reklamnom vezicom.
Modem automatski instalira svoje drivere, a za spajanje se koristi brendirana varijanta Optionovog izvrsnog GlobeTrotter Connect softvera, koji je lagan, brz i tolerantan spram drugih GSM mreža (za razliku od Vodafoneove glomazne katastrofe Mobile Connect). T-mobile Connect može se zamijeniti i nebrendiranom varijantom bez gubitka funkcionalnosti (generičku Optionovu varijantu verzije 3.0 bez drivera možete naći ovdje).
Dijagnostika kaže sljedeće:
Found modem : GlobeTrotter HSDPA
Modem Manufacturer: Option N.V.
Model : iCON 225
IMEI : 3545050xxxxxxx
Firmware : 2.5.21Hd (Date: Jun 17 2008, Time: 11:14:20)
Serial NR. : DR298AWxxx
SIM Lock status : Locked (PH-NET PIN)
Da rezimiramo, za relativno sitnu lovu možete dobiti nešto sitno bežičnog interneta i modem koji ćete moći koristiti s bilo kojim operaterom ukoliko vam zatreba. Konkurencija na tržištu je dobra stvar.
Vodafone Mobile Connect K3565
Moar gadjuts plz…
[UPDATE: K3565 (not the K3565-Z variant) can be network unlocked for free using a piece of software called “Sola GSM Calc”. Google it. ]
Croatian mobile provider VIPNET is currently having a sale on Vodafone Mobile Connect USB UMTS/HSDPA mobile datacards, selling them for 291 HRK, which is definitely the lowest price you can find if you’re looking for a cheap UMTS modem without a 24-month contract. T-mobile responded with the same thing, for 7 HRK more, but I’ll give you a rundown of the one I got my hands on.
“Vodafone Mobile Connect K3565” package includes the USB datacard featuring a built-in Micro SD card reader, a USB extension cable and a simcard. The device is actually a rebranded Huawei E160X modem (one of two devices T-mobile is currently selling for 298 HRK). This is what modem diagnostics have to say:
AT+GMM - E160X
ATI1 - Manufacturer: huawei
Model: E160X
Revision: 11.604.20.01.00
IMEI: XXXXXXXXXXXXXXX
+GCAP: +CGSM,+FCLASS,+DS
The device also comes with a prepaid SIM card with 20 HRK in the account, you can get an extra 80 HRK if you top-up your account and do everything the fine print says. Although Mobile CARNet is currently the cheapest mobile internet solution in Croatia, both as prepaid or a contract subscription (if you meet the requirements needed to get a CARNet account), with a little work and some money you can unlock the datacard and use it with data plans offered by Tele2/T-mobile.
As expected, the datacard has a network lock. However, the diagnostics software reported a “card lock”, so it’s possible that VIPNET locked the datacard to the SIM card that comes with it. You can easily unlock the datacard online, just visit www.dc-unlocker.com – buy 15 credits for 15 € via PayPal, enter your account data into the unlocking software, click on “Unlock” and you can use your datacard with any simcard. [see above for update] Bear in mind, however, that this datacard, as well as some other HSDPA/UMTS datacards, don’t recognize some of the early Croatian Tele2 simcards, which were sold when Tele2 entered the Croatian market.
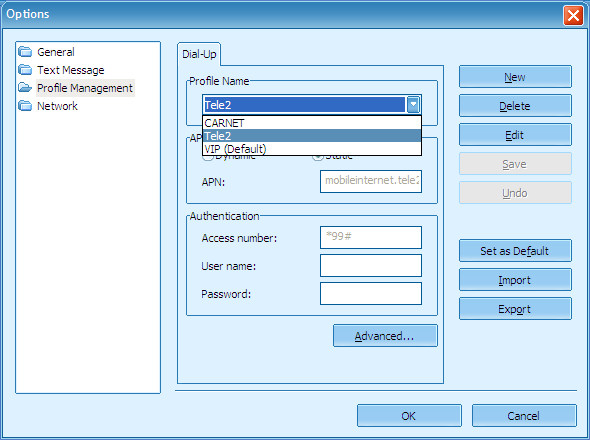
After your datacard is unlocked, in order to be able to connect to other mobile internet providers, you will first have to get rid of Vodafone VMC Lite software, which only lets you create profiles for mobile operators belonging to the Vodafone group. Huawei datacards have drivers and software embedded in the device, and when you plug them in, they mount a virtual CD-ROM and run the installation procedure. Of course, Vodafone Mobile Connect version of the E160 comes with VMC Lite and Huawei doesn’t offer any other software versions on their site.

You can get a copy of Huawei Mobile Partner Software (which does the same thing VMC Lite does, but the installation is about 40 megabytes smaller and it can be used with any mobile operator) here, or you can upgrade the datacard’s “dashboard” to make it mount Huawei Mobile Partner when you plug it in. Huawei.com, as already I mentioned, doesn’t have an upgrade package for the E160, but since most of their datacards use the same dashboard system, E160 can be safely upgraded with the software package for E169, found here. Upgrade package “E169 Client Software UTPSB030D01SP04C03” will replace the VMC Lite setup with Huawei Mobile Partner, everything else remains the same. You can freely add connection profiles for SIM cards of any mobile provider.

All of this is probably applicable for T-mobile Simpa Internet USB Stick Huawei E160, the only difference is that this version has some other connection software in the dashboard, possibly even Mobile Partner. Feedback welcome.
Još malo elektroničkih igračaka…
[AŽURIRANO: K3565 (samo taj model, ne i K3565 -Z) može se besplatno otključati da radi na svim mrežama pomoću programa ‘Sola GSM Calc’. Google! ]
VIPNET trenutno ima akciju na kojoj prodaje Vodafone Mobile Connect USB UMTS/HSDPA stick za mobilni internet cijeni od 291 kn, što je definitivno najjeftiniji način da se dočepate UMTS modema za sitnu lovu bez zasnivanja kojekakvih pretplata. Par kuna skuplju ponudu ima T-mobile (298 kn), ali zadržat ćemo se na ovoj kombinaciji.
U paketu dobivate bijeli “Vodafone Mobile Connect K3565” USB stick s USB produžnim kabelom i ugrađenim čitačem Micro SD kartica. Zapravo se radi o rebrandanom Huawei modemu E160 (jedan od dva modema koje T-mobile trenutno nudi za 7 kn više), što potvrđuje i dijagnostika.
AT+GMM - E160X
ATI1 - Manufacturer: huawei
Model: E160X
Revision: 11.604.20.01.00
IMEI: XXXXXXXXXXXXXXX
+GCAP: +CGSM,+FCLASS,+DS
Uz modem dobivate i SIM karticu s početnih 20 kn na računu, uz dodatnih 80 kn koje možete dobiti ako ispunite hrpu raznoraznih uvjeta koji su ispisani vrlo sitnim slovima u detaljima ponude. Iako je mobilni CARNet trenutno najjeftinija solucija za bežični internet sa i bez pretplate (naravno, ako ispunjavate uvjete dobivanja korisničkog računa), modem se bez većih problema i uz malu investiciju od 15 € može otključati za korištenje drugih pružatelja usluga ako vam više odgovara uzeti pretplatu za mobilni internet kod Tele2/T-mobilea.
Modem je, kao što je i za očekivati, zaključan na mrežu, iako je dijagnostički softver javljao “card lock”, stoga je moguće da je modem zaključan i na karticu koju dobijete s njime. Otključavanje se može izvesti vrlo bezbolno preko interneta na stranici www.dc-unlocker.com – kupite 15 kredita za 15 € preko PayPala, upišete u program pristupne podatke koje dobijete odmah nakon kupovine, kliknete Unlock i možete svoj modem korisititi s bilo kojom karticom. [v. početak članka za besplatno otključavanje] Nota bene – ovaj modem, kao i neki drugi modeli HSDPA/UMTS kartica imaju problema s prepozavanjem prve serije hrvatskih Tele2 SIM kartica, koje su bile u prodaji netom nakon njihovog ulaska na tržište.
Nakon što ste otključali karticu, da biste se spajali na mobilni internet drugih operatera morate se riješiti i Vodafone VMC Lite softvera, koji dozvoljava spajanje i postavljanje profila samo za providere Vodafone grupacije. Huawei modemi instalaciju softvera i drivera nose u sebi i kod spajanja na računalo podižu virtualni CD-ROM s kojega se to dvoje instalira. Naravno, Vodafone Mobile Connect varijanta E160 dolazi s VMC Lite paketom i na stranici proizvođača nema dostupnog pogonskog softvera za pojedinačan download.
Huaweijev Mobile Partner Software (koji radi isto što i VMC Lite, ali je četrdesetak megabajta lakši i radi sa svim mrežnim operatorima) možete skinuti ovdje, ili možete nadograditi “dashboard” modema kako bi vam po uključenju na računalo u virtualnom CD-ROM-u nudio Huaweijev softver. Na stranici proizvođača, kao što sam već napisao, ne postoji paket za nadogradnju E160, ali kako svi modemi imaju isti sustav dashboarda, E160 se provjereno može nadograditi softverskim paketom za E169 koji se nalazi ovdje. Instalacijski paket “E169 Client Software UTPSB030D01SP04C03” zamijenit će VMC Lite instalaciju Huawei Mobile Partnerom, sve ostalo ostaje isto. U Mobile Partneru slobodno možete dodavati pojedinačne profile za različite SIM kartice različitih operatera.
Sve ovo je vjerojatno primijenjivo i na T-mobile Simpa Internet USB Stick Huawei E160, jedino što je u njegovom dashboardu neki drugi softver, moguće i ovaj gore spomenuti. Povratne informacije od vlasnika tog sticka su dobrodošle.
Tilgin VOOD 452w kao SIP VOIP adapter
For tech-geeks only
We’ll be taking a break from our usual subjects with a short tutorial, interesting to a marginally small number of potential visitors to this site, but that’s where Google comes in. The rest of you are free to ignore this article unless, because if you’re not an Optima Telekom subscriber in Croatia or if your ISP doesn’t use this router, than the following two thousand words will be as interesting as a study on mating habits of earthworms.
Table of contents:
1. ‘Unlocking’ Optima Telekom’s Tilgin VOOD to access VOIP settings
2. Using Tilgin VOOD 452w as a wireless Access Point
3. Configuring Tilgin VOOD as a SIP VOIP adapter
4. FAQ
The hero in our story this piece of hardware…

Tilgin VOOD 452w is a triple-play DSL modem/router with a 4-port switch, WLAN, a VOIP interface providing two analogue phone lines and a management server which enables the ISP/telephony provider easy remote configuration and management. In Croatia, Tilgin VOOD is used by Optima telekom, in part as their wireless-enabled router, in part for their Halo^3 service (Optima is the only alternative telco in Croatia which offers an analogue POTS line direct-to-home – VOOD provides additional two phone lines; other telecom providers mainly use Thomson Speedtouch for their POTS over VOIP solutions).

Since the router is rather pricey, as a rule Optima Telekom installs this modem to HHH users, although they used to give it to users requesting WLAN-enabled modems before they switched to giving cheaper Edimax devices as their primary wireless routers. As far as they are concerned, and as far as the “average user” with a good-quality phone line is concerned, Tilgin VOOD is an excellent solution: it offers automatic configuration of the VOIP interface and WLAN (including WPA security on by default, something T-Com Croatia’s wireless modems and VIPNET’s Homeboxes still don’t do with factory settings), if the router gets amnesia or the end-user fucks something up the modem will revert to correct settings next time it reboots, and just to be on the safe side, some menu items in the web interface are disabled so the end-user wouldn’t mess up his phone lines.

However, a slightly more advanced user will see this modem as his worst nightmare, partly because of the idiot-proof configuration – the modem can’t be switched to “bridge” mode, all the settings you change have to be saved to the management server, and for safety, some of the options can’t be saved there at all. You’re gonna have a hard time setting up port forwards, but if you turn Universal Plug and Play (UPnP), this setting will not be saved on the management server – you have to call Optima’s Internet helpdesk and ask them to turn this on for you. The same thing will happen if you decided to switch your modem to “bridge” mode and use your existing router, the only difference being that Internet Helpdesk operators will refuse to switch your modem to “bridge” mode, even though it’s technically possible. If you happen to change your account password at Optima’s customer web site, you’ll have to call Customer Service once again because the management server has your old password saved.
1. ‘Unlocking’ Optima Telekom’s Tilgin VOOD to access VOIP settings
This step is very simple because you’re not actually unlocking anything – all you have to do is disconnect your router from the DSL line and revert the router to factory settings. Use a thin screwdriver or a straightened-out paperclip, stick it in the small hole marked “Reset” at the back of the router, between the on-switch and the ethernet connectors, and keep it pressed for five seconds, until all LED’s on the front light up.

This will give you access to all menu items in the web interface, because the router will be unable to sychronise with the management server. If later you decide you want to use your router as you did before, provided you haven’t tampered with management server settings, all you will have to do is re-connect the modem to the DSL line on which it was initially activated and it will re-configure itself. The opposite is also true – as long as you want to keep your own settings for the router, you mustn’t re-connect it to the DSL line.
Once you separate the router from its management server, it will save all its settings locally, even after you turn it off. While you configure it, the router will often warn you to save your settings under “Tools – Save All”. Once you’ve finished configuring the router, do this to save your configuration locally.

2. Using Tilgin VOOD 452w as a wireless Access Point
If you want to use VOOD as an Access Point providing Internet connectivity (without using it as a modem), you will require a properly configured DSL modem/router to provide Internet connectivity for Tilgin VOOD.
2.1. Connect your computer to any of the four LAN connectors at the back of Tilgin. Leave your network interface settings at DHCP. Switch on the router and wait a few minutes. If your network adapter doesn’t acquire and IP address, disconnect and reconnect the ethernet cable.
Start up the web browser of your choice and point it to http://192.168.1.1/. Log in to the router’s web interface – select “Login”, leave Conf as the username, the password is admin.

After logging in, the interface should look like this:
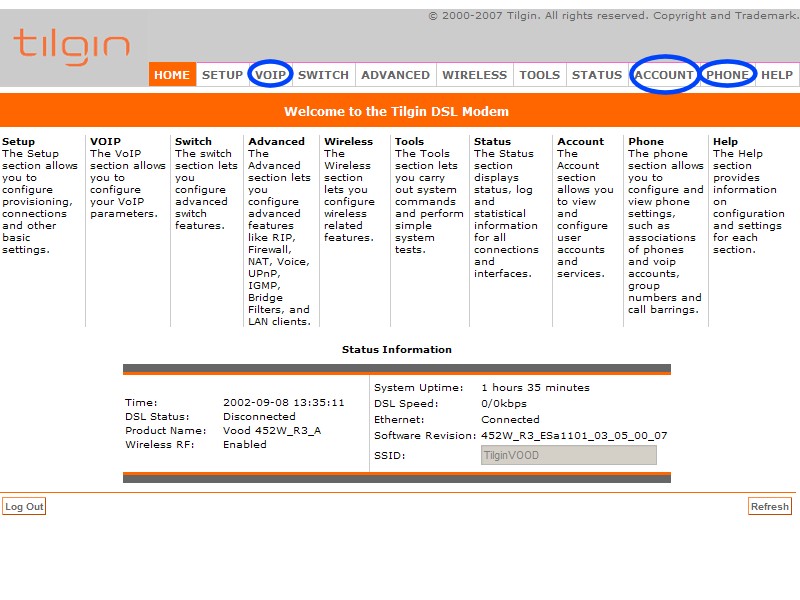
If your interface is different from this (or rather, if you don’t see the highlighted items), try to reset te router to factory settings once again.
2.2. First we’ll configure the wireless network. Click on Wireless and then Setup. Check Enable AP, choose your SSID, channel and all other settings as you like. After making all the changes, you should click the Apply button at the bottom of the page. You should do this whenever you change something, so I won’t repeat this throughout the tutorial.

You can leave the Configuration and Management sections as they are. Under Security you should turn on the wireless protection, preferably WPA encryption with a PSK password, which should have a minimum of eight characters. The maximum lenght is 63 characters.

2.3. In the previous step, we’ve turned on the AP, making the wireless clients a part of the same LAN as the computer connected to the LAN ports at the back of the router. If you want to bridge this network with your existing LAN or the Internet, do the following: click on Setup, then LAN Configuration. You will get this screen:

Now click on Configure. On the next screen, select “Use the following Static IP address”.

IP Address should be any free IP address in the subnet you’re using (most routers use 192.168.1.x; Edimax routers, e.g. use 192.168.2.x).
Netmask: 255.255.255.0
Default Gateway: your other router’s IP, usually 192.168.x.1
Now select Enable DHCP Relay, and under Relay IP re-enter the IP address of the router you use for Internet access. Sometimes some of these boxes get inexplicably greyed out (just like Relay IP box is greyed out on my screenshot), you should just ignore this, because it seems like it’s a bug. Once you’ve entered everything, regardless of which box is greyed out, click Apply. Finally, go to Tools, then System Commands and select Save All.

This ends the tutorial for turning Tilgin VOOD-a into a wireless Access Point, without using it as a modem.
3. Configuring Tilgin VOOD as a SIP VOIP adapter
Here, we will set up the two analogue phone ports to use a VOIP provider. You can get a VOIP account with any of dozens of providers, some of them even offer direct dial-in numbers in Croatia, and if you’re looking a bit closer to home, you can check out VIPnet and it’s worth noting that VIPnet’s VOIP service does not work over 3rd party VOIP adapters (or at least I was unable to get it to work).
3.1. The first step is to assign a way for the router to connect to the internet, since routing settings we configured for the wireless interface are not enough. We will do this by clicking on Setup, and under WAN Setup we select New Connection.

The settings are as follows:
Name: name your connection any way you want.
Type: Bridge
Sharing: Enable
Bridge Settings: leave Encapsulation as it is, under Select LAN click “LAN group 1”.
Check Auto PVC to avoid any error messages from the router, although this setting is unused in bridge mode. Once you’ve set everything up, click Apply. After that, the newly-created connection should appear under the Modem item within WAN Setup.

3.2. Now that we’ve gotten the router online, we need to activate the Voice capabilities of the modem and select the Internet bridge we have just set up. We do this under Advanced – Voice. Check Enable Voice and select the connection you created. Apply.

3.3. Now we move onto VOIP settings. Click on the VOIP item. Under Country specific you can select the country whose telephone system you want to emulate (in regards to the dial tone, busy signal, ring type and so on). If you want the dialtone used in Croatia, you should choose Slovenia.

Under VOIP – SIP you can choose a SIP port (if different from the default one), DTMF generation and some other options you probably won’t need to change.

The following item, Dial Plan is crucial for the correct functioning of the VOIP interface, but unfortunately, it is undocumented in the router itself, so I had to resort to trial and error. If someone can get me a copy of Tilgin’s official documentation for internet service providers, I’d love to see it.

If you set up your dial plan like I did, the system will prefix a short six or seven digit number with the area (county) code and the country code (my VOIP provider expects the number in the international format to be dialled, including 00 before the country code), whereas other dialled numbers (which I have to dial as 00385+area code+subscriber number) will be passed on unchanged. The default settings are incorrect, and if you leave these fields empty, you won’t be ably to dial any number.
In the above setup, X replaces any dialled number, T is probably some standard waiting time before phone number entry is considered to be complete, I have no idea what “+” stands for. In the right column $0 returns the whole number, as dialled. This system probably has a way of returning the dialled phone number without the first digit (necessary if you want to turn 01xxxxxxx numbers into the international format of, e.g. 3851xxxxxxx), but without any official documentation, I wasn’t able to find out how to do this (and no, $1 is not the solution).
There is no need to change anything under the Codecs tab; Caller ID can be set up under Services. FSK protocol is usually used in Croatia, but it all depends on the type of telephone you are using.

This completes this part of the setup, so you need to click “Activate” in order to save and apply this portion of the setup.
3.4. Time to add a VOIP account. You can do this under the Account tab.

This is where you have to enter the information you received from your VOIP service provider, namely the VOIP number or username, proxy and registration server, username and password. You also have to choose which analogue port or ports you want to use when receiving incoming calls (if your VOIP provider offers this service). You don’t need to make any additional alterations here, so just click on Save and then Activate.
3.5. Phone setup
Under the item Phones you can give your two analogue ports internal numbers and choose which ports you want to use with for incoming/outgoing calls in conjunction with which VOIP account. This means that you can have two VOIP phones which use two different providers. No need to change any of the other options.

Once everything has been set up to your liking, click Activate.
3.6. Testing
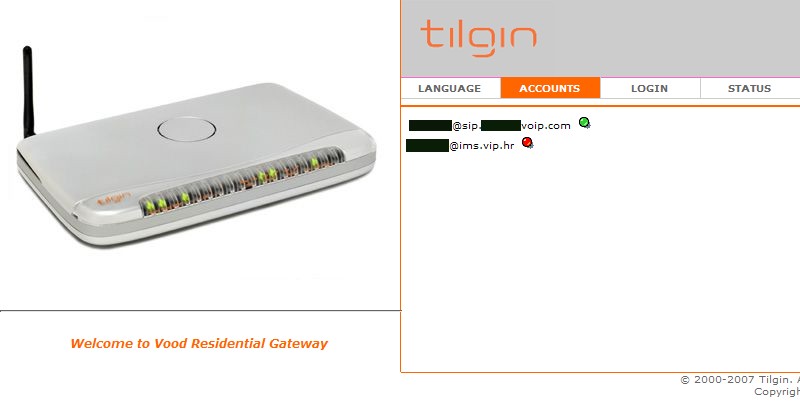
After you have set up everything and the router has activated its settings, open the web interface once again and check if everything is okay under Accounts. If the connection with the VOIP provider is active, the items will be green. If you log in into the router using one of the VOIP usernames instead of the Conf user (these usernames have no assigned password), you can access the call list and reconfigure the accounts.
3.7. Optional setup of NTP servers
If you plan on using the incoming/outgoing call logs on the router, correct time and date might come in handy. My example uses CARNet NTP servers.

4. Frequently Asked Questions
Q: Where can I get a Tilgin VOOD 452w?
A: Sign up with Optima Telekom in Croatia and request the Halo Halo Halo service.
Q: I’m already an Optima Telekom subscriber and I have this router. Can I do any of this?
A: You can, but unless you have a different modem to use with your broadband connection, you won’t be able to use it this way.
Q: Will any of this void my warranty?
A: No, there shouldn’t be any issues with the warranty.
Q: I’ve messed something up and I can’t access my modem.
A: Do a factory reset.
Q: I’ve followed your instructions and I’ve frakked something up. Who can I complain to?
A: You can complain to anyone you want, but bear in mind that I’m not responsible for anything you may have done.
For tech-geeks only
Odmor od uobičajenih tema uz jedan mali tutorial, zanimljiv doista marginalno malome broju potencijalnih posjetitelja, ali zato je tu Google da ih uputi na pravo mjesto. Ostali slobodno ovaj članak mogu ignorirati jer ako niste korisnik Optima telekoma i ako nemate router iz naslova, sljedećih dvije tisuće riječi bit će vam zanimljivi kao i studija o spolnim navikama kišnih glista.
Sadržaj:
1. ‘Otključavanje’ Optiminog Tilgin VOOD-a za pristup VOIP postavkama
2. Korištenje Tilgin VOOD-a 452 kao bežične pristupne točke
3. Konfiguriranje Tilgin VOOD-a kao SIP VOIP adapter
4. Pitanja i odgovori
Junak priče je, dakle, ovaj komad hardvera…
Tilgin VOOD 452w je triple-play DSL modem-router s 4-portnim switchem, WLAN-om i VOIP sučeljem s izlazom za dvije telefonske linije i management serverom pomoću kojega pružatelj pristupa Internetu i/ili telefonskoj usluzi može jednostavno daljinski konfigurirati uređaj. Tilgin VOOD u Hrvatskoj koristi Optima telekom, dijelom kao dio ponude WLAN modema, a dijelom i za svoju Halo^3 uslugu (Optima je jedini alternativni operater koji nudi analognu POTS liniju od centrale, za preostale dvije linije u navedenoj usluzi zadužen je VOOD; ostali provideri za svoja POTS/VOIP rješenja mahom koriste Thomson Speedtouch).
Zbog paprene cijene uređaja, Optima ovaj router instalira prvenstveno HHH korisnicima, iako su ga jedno vrijeme davali i korisnicima koji su zatražili WLAN modeme, prije no što su za tu svrhu prešli na jeftinije Edimax uređaje. S njihove strane i sa strane “prosječnog korisnika” s kvalitetnom paricom, Tilgin VOOD je odlično rješenje: nudi automatsku konfiguraciju VOIP sučelja i WLAN-a (uključujući i difoltnu zaštitu WLAN-a, nešto što T-com-ovi bežični modemi i VIPNET-ovi Homeboxovi još uvijek ne doživljavaju s tvorničkim postavkama), ako modem slučajno dobije amneziju ili krajnji korisnik nešto sprčka, kod sljedeće sinkronizacije modema s centralom vratit će se ispravne postavke, a i izbornici su okljaštreni kako krajnji korisnik ne bi dirao po VOIP postavkama.
Malo napredniji korisnik će ovaj modem doživjeti kao noćnu moru, upravo zbog idiot-proof konfiguracije, jer modem je u routing modu, sve izmjenjene postavke nužno je usnimiti na management server nakon konfiguracije, a iz sigurnosnih razloga neke od opcija se na server uopće ne mogu snimiti. Portove ćete nakon dosta gnjavaže moći pojedinačno otvoriti, ali Universal Plug and Play (UPnP) neće ostati zapamćen na serveru – za ovo morate zivkati Optimin internet helpdesk i gnjaviti ih da vam to uključe za stalno. Isti problem imat ćete ako želite prebaciti svoj modem u bridge mode i koristiti svoj postojeći router, s jedinom razlikom što vam ovo djelatnici internet helpdeska neće (htjeti) napraviti iako je izvedivo ako nemate HHH uslugu. Ako slučajno promijenite zaporku za spajanje na internet na optiminim stranicama, opet ćete napraviti problem koji morate rješavati u suradnji sa SZK-om jer management server ima staru zaporku.
1. ‘Otključavanje’ Optiminog Tilgin VOOD-a za pristup VOIP postavkama
Ovaj korak je vrlo jednostavan, jer zapravo nema nikakvog ‘otključavanja’ – potrebno je samo modem odvojiti od DSL linije i vratiti modem na tvorničke postavke. Tanki odvijač ili izravnatu spajalicu gurnite u otvor označen Reset na poleđini routera, između prekidača za uključivanje i ethernet konektora i držite ga pritisnutog 5 sekundi, dok se sve LED-ice na prednjoj strani ne upale.
Ovako ćete dobiti kompletne izbornike u web sučelju routera, jer on neće moći povući postavke s management servera. Ukoliko router kasnije želite normalno koristiti na Optimi, pod uvjetom da niste dirali parametre management servera, dovoljno je modem priključiti na DSL liniju na kojoj je prvotno aktiviran i on će povući svoje zadane postavke. Vrijedi i obrnuto – dok god želite koristiti svoje postavke modema, ne smijete DSL liniju priključivati na ADSL sučelje.
Kada router odvojite od management servera, on će sve svoje postavke pamtiti lokalno, čak i nakon reseta. Kod konfiguracije modem će vas učestalo upućivati/upozoravati da na kraju rada pohranite postavke opcijom “Tools – Save All”, ovo napravite nakon što ste dovršili podešavanje kako bi router lokalno pohranio konfiguraciju.
2. Korištenje Tilgin VOOD-a 452 kao bežične pristupne točke
Da biste VOOD koristili kao bežični Access Point koji će pružati izlaz na internet, trebate imati već priređen izlaz na internet putem nekog drugog DSL modema/routera.
2.1. Spojite svoje računalo na bilo koji od četiri LAN priključka na Tilgin VOOD-u. Postavke mrežne kartice ostavite na DHCP-u. Uključite router i pričekajte minutu-dvije. Ukoliko mrežna ne dobije IP od VOOD-a, isključite i uključite mrežni kabel.
Otvorite browser i upišite http://192.168.1.1/ u adresnu liniju. Prijavite se u konfiguraciju routera – kliknete na Login, pod Username ostavite Conf, a za password upišite admin.
Nakon što ste se ulogirali, trebate dobiti sučelje nalik ovome:
Ukoliko sučelje ne izgleda kao na slici (odnosno ako nemate istaknute stavke), ponovno pokušajte vratiti router na tvorničke postavke.
2.2. Prvo ćemo konfigurirati bežičnu mrežu. Otiđite na Wireless i potom na Setup. Stavite kvačicu pod Enable AP, odaberite SSID, kanal i ostale postavke po želji. Nakon što ste napravili sve izmjene na stranici koje želite, obavezno kliknite na gumb Apply u dnu stranice. Ovo vrijedi i u nastavku tutoriala i neću to dodatno napominjati.
Configuration i Management kartice možete ostaviti kakve jesu. Pod Security treba uključiti zaštitu bežične mreže i to WPA s PSK zaporkom koja mora imati najmanje 8 znakova, a može biti do 63 znaka duljine.
2.3. Prethodnim korakom uključili smo AP i bežični klijenti dio su iste mreže kao i računala spojena putem LAN portova na poleđini routera. Ako želimo ovu cijelu mrežu povezati s ostatkom našega LAN-a ili s Internetom, potrebno je iskonfigurirati LAN u routeru. Kliknite gore na Setup, pa na LAN Configuration. Dobit ćete ovo:
Kliknite sada na Configure. Na sljedećem ekranu odabrat ćemo opciju “Use the following Static IP address”.
IP Address neka bude bilo koja slobodna IP adresa u subnetu kojega koristite (kod većine routera to je 192.168.1.x; Edimax routeri koriste 192.168.2.x).
Netmask: 255.255.255.0
Default Gateway: IP adresa vašega routera, obično 192.168.x.1
Potom odaberite opciju Enable DHCP Relay, a pod Relay IP ponovno unesite IP adresu vašeg routera za pristup internetu. Može se dogoditi da vam se neke od gornjih kućica za unos zasive (kao što je zasivljena Relay IP kućica na gornjoj slici), ignorirajte ovo jer mi se čini da se radi o bugu. Kad ste unijeli sva polja, bez obzira koje je zasivljeno, napravite Apply. Na posljetku, kliknite na Tools, pa na System Commands i odaberite Save All.
Ovime ste dovršili pretvaranje Tilgin VOOD-a u bežični Access Point.
3. Konfiguriranje Tilgin VOOD-a kao SIP VOIP adapter
U ovome dijelu, konfigurirat ćemo dva analogna telefonska porta na routeru za korištenje VOIP providera. SIP VOIP account možete otvoriti kod nekog od bezbroj providera, neki provideri nude čak i dolazne brojeve u Hrvatskoj, a ako trebate nešto bliže, možete se obratiti i VIPnetu a vrijedi napomenuti i da VIPnetova VOIP usluga ne radi preko 3rd party VOIP adaptera (ili je barem ja nisam uspio iskonfigurirati).
3.1. Prvi korak je zadati routeru kako da se spaja na Internet, jer routiranje koje smo postavili u prethodnim koracima za WLAN nije dovoljno. Otići ćemo na Setup, te pod WAN Setup odabrati New Connection.
Postavke su sljedeće:
Name: odaberite proizvoljan naziv veze.
Type: Bridge
Sharing: Enable
Bridge Settings: Encapsulation ostavite kako je i bio, pod Select LAN odaberite “LAN group 1”.
Dolje stavite kvačicu pod Auto PVC kako vam router ne bi javio pogrešku, iako ove postavke nisu važne. Kad ste sve postavili kao na slici, kliknite Apply. Nakon toga, novokreirana veza treba se pojaviti ispod Modem pod WAN Setup.
3.2. Kada smo riješili izlaz na Internet, trebamo aktivirati Voice mogućnosti modema i odabrati taj način pristupa. Ovo radimo pod Advanced – Voice. Stavite kvačicu pod Enable Voice i odaberite kreiranu konekciju. Apply.
3.3. Sada počinjemo s konfiguracijom VOIP mogućnosti. Prelazimo na karticu VOIP. Pod Country specific biramo državu čiji telefonski sustav želimo emulirati (zvuk slobodnog biranja, zvuk zauzeća, tonski signal linije u kvaru, način zvonjave i slično). Ako želite naš klasični tu-tuuuuuu signal u slušalici, odabrat ćete Sloveniju.
Pod VOIP – SIP opcijom možete postaviti SIP port (ukoliko se razlikuje od standardnoga), generiranje DTMF tonova i još poneke opcije koje vjerojatno nećete morati mijenjati.
Sljedeća stavka, Dial Plan važna je za ispravan rad VOIP sučelja, ali nažalost nedokumentirana, tako da sam do postavki toga došao metodom pokušaja i pogrešaka. Ako netko ima službeni Tilginov manual za providere u kojemu je ovo dokumentirano, vrlo rado bih ga volio vidjeti.
Ovakva konfiguracija će lokalnim pozivima do šest ili sedam znamenki dodijeliti pozivni broj županije i pozivni broj države (moj VOIP provider zahtjeva biranje cijeloga broja, uključujući i 00 prije pozivnog broja države), dok će sve ostale birane brojeve (koje moram birati u formatu 00385+pozivni broj županije+pretplatnički broj) propustiti bez promjene. Tvorničke postavke nisu točne, a ako ostavite ova polja prazna nećete moći zvati niti jedan broj.
U gornjim postavkama X zamijenjuje bilo koji birani broj, T je vjerojatno nekakva standardna vrijednost čekanja prije no što se broj smatra biranim do kraja, za “+” ne znam čemu služi. U desnome stupcu $0 vraća cijeli birani broj. U ovome sustavu vjerojatno postoji i način da se vrati cijeli birani broj bez prve znamenke (što je neophodno za pretvaranje 01xxxxxxx brojeva u 3851xxxxxxx), ali bez uvida u službenu dokumentaciju nemoguće je pronaći kako to izvesti (i ne, $1 nije rješenje).
Karticu Codecs nema potrebe mijenjati, a pod Services možete si uključiti prikaz broja pozivatelja (CLIP) i odabrati način prikaza. Kod nas se obično koristi FSK protokol, ali sve ovisi o telefonskom uređaju kojega imate.
Ovime smo završili s ovim dijelom podešavanja, pa je potrebno kliknuti na Activate kako bismo snimili i primijenili ovaj set postavki.
3.4. Vrijeme je i da dodamo VOIP account. Ovo radimo na kartici Account.
Ovdje upisujete podatke koje ste dobili od svog VOIP providera – broj ili korisničko ime, proxy i registration server, korisničko ime i zaporku, te odabirete priključak ili priključke koji će primati dolazne pozive (ako imate tu mogućnost). U ovome dijelu više nemate ništa za podešavati, stoga svakako kliknite na Save i potom na Activate.
3.5. Podešavanje telefonskih uređaja
Pod Phones odredite interne telefonske brojeve za vaša dva priključka, te odaberite koji priključak želite koristiti za dolazne ili odlazne pozive u kombinaciji s kojim VOIP accountom. Ovo znači da možete imati dva VOIP telefona koji mogu biti povezani s različitim providerima. Podešavanje ostalih opcija nije nužno.
Kada ste sve uredili po želji, kliknite Activate.
3.6. Provjera
Nakon što ste sve podesili i router je aktivirao postavke, ponovno otvorite njegovo web sučelje i pod Accounts provjerite je li sve u redu. Ako je veza s VOIP providerom ispravna, to ćete ovdje vidjeti. Ako se u router prijavite s nekim od VOIP korisničkih imena umjesto kao Conf (ti korisnici nemaju zadanu zaporku), možete pregledavati popise poziva i na taj način vršiti konfiguraciju.
3.7. Opcionalno podešavanje SNTP servera
Ako mislite koristiti logove dolaznih i odlaznih poziva u routeru, dobro će vam doći ako on ima postavljeno točno vrijeme i datum. Na mome primjeru korišteni su CARNetovi NTP serveri.
4. Pitanja i odgovori
P: Kako i gdje nabaviti Tilgin VOOD 452w?
O: Postanite korisnik Optima telekoma i zatražite uslugu Halo Halo Halo. Ili bežični DSL modem, ali ovo vam ne garantira da ćete dobiti baš ovaj uređaj.
P: Već sam Optimin korisnik i imam ovaj router. Mogu li probati sve ovo?
O: Možete, ali ukoliko nemate drugi modem za spajanje na internet, nećete ga moći koristiti na navedene načine.
P: Imam ovaj router i živcira me, želim ga zamijeniti drugim da bih ga mogao koristiti na ovaj način.
O: Predajte Optimi zahtjev za izmjene na korisničkom računu i zatražite žični modem. Možete ga dobiti za 1 kn s produljenjem ugovorne obveze od 24 mjeseca (koliko znam, ovo nije kumulativno, dakle ne zbrajaju vam se prva i druga ugovorna obveza već samo kreće nova od dana preuzimanja novog modema).
P: Gubim li jamstvo ako radim bilo što s ove stranice?
O: Ne, ne biste trebali imati nikakvih problema s jamstvom.
P: Zbrljao sam nešto i ne mogu pristupiti modemu.
O: Napravite tvornički reset.
P: Slijedio sam ove upute i nešto sam gadno zbrljao. Komu se mogu požaliti?
O: Kome god hoćete, ali imajte na umu da ste sve radili na vlastitu odgovornost. Ukoliko ipak imate dodatnih komentara, prigovora ili pritužbi, obratite se bilo koji od kontakt brojeva.
P: Zašto ovaj članak ima dio Pitanja i odgovori?
O: Zato što ih ja volim pisati.
